December 8, 2016

SAML Assertion Query/Request Profile- WSO2 IS Client Configuration


In this post I will explain you how to test Assertion Query/Request profile feature in WSO2 Identity server v 5.3.0 and onward.First you need to clone or download client application from the below git repository.
https://github.com/gayangithub/wso2-is-assertion-query-client

Start Identity Server, select Service Providers---> Add and create new service provider. Here I create travelocity.com as service provider.
WSO2 IS Create Service Provider 
Now go to Home > Manage > Keystores > List and click on import cert. Browse to below path and import certificate into Identity Server.

CERTIFICATE_FILE_PATH : wso2-is-assertion-query-client\src\test\resources\soa.cert

Now you need to configure newely created service provider. So go to Home> Identity > Service Providers > List> SAML SSO Configuration and add aseertion consumers URL, certificate alias and so on as below.
Configure service Provider
Go to WSO2IS_HOME/repository/conf/identity/identity.xml and check the Assertion builder class. For this profile we use custom assertion builder which has capability to persist Assertions on database.Check for SAMLSSOAssertionBuilder element and value should be org.wso2.carbon.identity.sso.saml.builders.assertion.ExtendedDefaultAssertionBuilder
When users login, created assertions persist in IDN_SAML2_ASSERTION_STORE table on H2 database. You can verify, is that table available on database server referring below tutorial. http://www.vitharana.org/2012/04/how-to-browse-h2-database-of-wso2.html

You can try a test login using travelocity.com service provide by accessing this URL
https://localhost:9443/samlsso?spEntityID=travelocity.com with 'admin' username and 'admin' password. Check database for newely created assertion.
Assertion Query Request feature support below request message types.

1. AssertionID Request - require to store assertions
2. AttributeQuery - not required to store assertions
3. AuthnQuery - required
4. AuthzDecision - required
5. SubjectQuery -not required


Now we are ready to test a scenario. I select AssertionID Request to test. Now open above repository source codes using your IDE and go to wso2-is-assertion-query-client\src\test\java\org\wso2\carbon\identity\query\saml\test . Open SAMLAssertionIDRequestClient.java
Copy a AssertionID from your database--> table-->column  IDN_SAML2_ASSERTION_STORE.SAML2_ID  and assign value to ASSERTION_ID variable in above class. Run the main() of  SAMLAssertionIDRequestClient class.
Here you can see generated request message.
And the response message from IS

As above you can try other messages also with changing SessionIndex, subject, attributes and so on.

September 13, 2016

SAML2 Assertion Query Request / Response Messages - part 3

AuthzDecision Query is used to determine some actions on some resources be allowed to a particular subject. This request message present Evidence such as AssertionIDRef , Assertion to verify subject.

AuthzDecision Query Request Message


AuthzDecision Query Response Message


Customized Error Response Message

IDP must return Response message for each and every request which received from the SP. IDP can report errors in request message or server failures of it self.

Invalid Issuer Error Response 


Invalid SAML Version Error Response 


Invalid Subject Error Response 


Invalid SessionIndex or Auth-Context Error Response 


SAML2 Assertion Query Request / Response Messages - part 2


AuthnQuery Request message is used to check Assertions which match with given Subject and Authentication statements such as SessionIndex, Auth-context.

AuthnQuery-SessionIndex Request Message


AuthnQuery-SessionIndex Response Message


AuthnQuery-AuthContext Request Message


AuthnQuery-AuthContext Response Message


SAML2 Assertion Query Request / Response Messages - part 1


Service Providers are able to query dynamic or existing assertions from Identity Provider by following SAML2 specification, using standard request messages.Identity Provider need to issue Response message for each request. If the request message contains errors, then IDP should add error status and message into the Response message.Response message may contain one or more assertions or no any assertion.

Attribute Query Request Message


Attribute Query Response Message


AssertionIDRequest Request Message


AssertionIDRequest Response Message

August 23, 2016

GSoC 2016 : SAML Assertion Query/Request Profile support for WSO2 Identity Server

Introduction

WSO2 Identity Server is an open standards based Identity and Access Management system. It supports some of the major SAML2 based profiles such as Web Browser based SAML2 SSO, Single logout, Basic attribute profile and also WS-Trust.  Therefore Identity Server issues SAML2 Assertion to requested entities.  It can act as “SAML Authority” according specification. Although Identity Server can issue SAML2 Assertions based on various standards, currently it does not support for Assertion Query/Request Profile.  So, implementing this profile, will add more value to Identity Server. "Assertion Query/Request Profile" defines a protocol for requesting dynamic or existing Assertions from SAML Authority by reference or by querying on the basis of a subject and additional statement-specific criteria. Assertion Query/Request Profile is based on five Assertion request messages. 

Workload

Assertion Request Messages Processing

SAML Authority (WSO2 Identity Server) receive five types of requests to query Assertions. I Implemented new component with service end point to receive these request messages and validate messages. Then according to the request message type  query assertions from databases, build response message and return response message to requester. 

Assertion Store Feature in WSO2 Identity Server

I implemented custom assertion builder to persist assertions before return assertions to the Service Providers.

Code Contribution

(SAML Assertion Query Profile as a component)
 (Integration Tests)
 (Assertion Persistence Feature)
(SAML Assertion Query Profile Implementation )

Future Works

WSO2 Identity Server does not support to persist assertions in database. So writing new component to store assertions and mount a new table for assertions in carbon-identity-framework is challengeable. The technique of storing assertions is directly affect server performance. So it is required to use cache and background processes to reduce server delay on read and writes as a future work.


Useful Links


Conclusion

I would like to thank my mentor Omindu Rathnaweera,  Asela Pathberiya and WSO2 IS team for the great support and help they provided for the success of this project. Thank you very much Google for the great opportunity given to me.

May 28, 2016

SAML2.0 Assertion Query/Request Profile - Introduction


What is SAML


SAML is the short form of Security Assertion Markup Language. It is a universal standard for authentication request messages and response messages. SAML consist with two profiles

  • Active Profile - Process through web browser using redirects
  • Passive Profile - Process directly using API calls (Mostly in mobile applications)


Use case of SSO with SAML is when a Service Provider (SP) has multiple services (Example Google has Gmail, Google Drive, Keep, Google Doc and etc.) users had to logging several times for that services with different credentials. So it is bad experience. Then service provider had to keep multiple database instances to manage users for multiple services. It is worst design for administrative tasks. Security issues can be occur at service provider’s methodology. So SSO separate user credential information from service provider and add it to a separate server called Identity Provider (IDP).It holds user credentials, user roles on multiple services of particular Service provider and other attributes of user like email, contact no, date of register and etc. Service providers can have multiple IDPs and identity provides can have multiple service providers.
Message Flow


According to the order of initiating authentication process there are two types.
  •          IDP Initiative – client directly contact IDP then SP
  •          SP Initiative – client connect with SP first and redirect to IDP

SAML is better for authentication message passing because it eliminate opportunities to phishing attack, eliminate administrative effort, high level of binding with different entities.

SAML Response is consist with Assertion. This SAML response has two sections
  •  Payload format – Content of the message (receiver, sender, signature, user’s attributes and etc.)
  •  Transport format – Relevant information for message transport (IP addresses, protocols, status)
There are three major components are used for SSO functionality with SAML standard.
1. Client/Principal
2. Service Provider (SP)
3. Identity Provider (IDP)

Information flow of client

Information flow of IDP

Information flow of SP


Assertion is a part of the Response message. We can discuss about Assertion in next tutorial.

March 24, 2016

Install Oracle 12c in Linux(Ubuntu 14.04)

Installation Process

As the first step to install Oracle12c you need to make your Unix system up to date. So run below commands to upgrade packages in your computer. Open your terminal by pressing ALT+CTRL+T  at same time.

sudo apt-get update 
sudo apt-get dist-upgrade
sudo reboot

Now your computer will restart. After completing above commands your computer has newest version of repositories and packages.
Now you need to install dependencies for the Oracle package. You can complete that process by below command.

sudo apt-get -y install alien binutils build-essential \
cpp-4.4 debhelper g++-4.4 gawk gcc-4.4 gcc-4.4-base \
gettext html2text lib32z1 lib32ncurses5 intltool-debian \
ksh lib32z1-dev libaio-dev libaio1 libbeecrypt7 libc6 \
libc6-dev libc6-dev-i386 libelf-dev libelf1 libltdl-dev \
libltdl7 libmotif4 libodbcinstq4-1 libodbcinstq4-1:i386 \
libqt4-core libqt4-gui libsqlite3-0 libstdc++5 libstdc++6 \
libstdc++6-4.4-dev lsb lsb-core lsb-cxx lsb-desktop \
lsb-graphics make odbcinst pax po-debconf rpm \
rpm-common sysstat unixodbc unixodbc-dev unzip
installing dependencies
  
A special requirement in Oracle installation package is you can’t install it using root user. So you need to create non-root user with permission for directories. Create secondary user with below commands. To run these commands you need to be root/root equivalent  to user. For that run below command.
sudo su
sudo addgroup oinstall
sudo addgroup dba
sudo addgroup nobody
sudo usermod -g nobody nobody
sudo useradd -g oinstall -G dba -p password -d /home/oracle -s /bin/bash oracle
sudo mkdir /home/oracle
sudo chown -R oracle:dba /home/oracle
sudo mkdir -p /u01/app/oracle
sudo mkdir -p /u01/binaries
sudo chown -R oracle:dba /u01
sudo passwd oracle
 
 
If you are done upto this point now you need to configure kernel parameters and resource limits.
echo 'Red Hat Linux release 6' | sudo tee -a /etc/redhat-release
sudo mkdir /usr/lib64
sudo ln -s /etc /etc/rc.d
sudo ln -s /lib/x86_64-linux-gnu/libgcc_s.so.1 /lib64/
sudo ln -s /usr/bin/awk /bin/awk
sudo ln -s /usr/bin/basename /bin/basename
sudo ln -s /usr/bin/rpm /bin/rpm
sudo ln -s /usr/lib/x86_64-linux-gnu/libc_nonshared.a /usr/lib64/
sudo ln -s /usr/lib/x86_64-linux-gnu/libpthread_nonshared.a /usr/lib64/
sudo ln -s /usr/lib/x86_64-linux-gnu/libstdc++.so.6 /lib64/
sudo ln -s /usr/lib/x86_64-linux-gnu/libstdc++.so.6 /usr/lib64/
sudo cp /etc/security/limits.conf /etc/security/limits.conf.original
echo "#Oracle 12C shell limits:" | sudo tee -a /etc/security/limits.conf
echo "oracle soft nproc 2048" | sudo tee -a /etc/security/limits.conf
echo "oracle hard nproc 16384"| sudo tee -a /etc/security/limits.conf
echo "oracle soft nofile 1024" | sudo tee -a /etc/security/limits.conf
echo "oracle hard nofile 65536" | sudo tee -a /etc/security/limits.conf
echo "#" | sudo tee -a /etc/sysctl.conf
echo "# Oracle 12C entries" | sudo tee -a /etc/sysctl.conf
echo "fs.aio-max-nr=1048576" | sudo tee -a /etc/sysctl.conf
echo "fs.file-max=6815744" | sudo tee -a /etc/sysctl.conf
echo "kernel.shmall=2097152" | sudo tee -a /etc/sysctl.conf
echo "kernel.shmmni=4096" | sudo tee -a /etc/sysctl.conf
echo "kernel.sem=250 32000 100 128" | sudo tee -a /etc/sysctl.conf
echo "net.ipv4.ip_local_port_range=9000 65500" | sudo tee -a /etc/sysctl.conf
echo "net.core.rmem_default=262144" | sudo tee -a /etc/sysctl.conf
echo "net.core.rmem_max=4194304" | sudo tee -a /etc/sysctl.conf
echo "net.core.wmem_default=262144" | sudo tee -a /etc/sysctl.conf
echo "net.core.wmem_max=1048586" | sudo tee -a /etc/sysctl.conf
 
Below command is specifying how much of physical memory you allocate for oracle processes. In this case it allocate 1GB in byte.
echo "kernel.shmmax=1073741824" | sudo tee -a /etc/sysctl.conf
You can see parameters you set using below command.
sudo sysctl –p
You need to change start-up script, for that run below command
for i in 0 1 2 3 4 5 6 S
do sudo ln -s /etc/rc$i.d /etc/rc.d/rc$i.d
done
Now your system is well configured for Oracle installation. You need to download Oracle setup file from oracle website. Please keep in mind to download Linux x86-64 distribution. Now you need to extract downloaded zip files.
cd /u01/binaries
cp  /linuxamd64_12102_database_se2_*of2.zip ./
unzip linuxamd64_12102_database_se2_1of2.zip
unzip linuxamd64_12102_database_se2_2of2.zip
 Before doing installation we need to grant permission to the user.For that run below command.
chown -Rf oracle:dba /u01/binaries
Now you need to switch to non root user. For that logoff and login as newly created  oracle user.
After login run below command.
run installer
 cd /u01/binaries/database
/u01/binaries/database/runInstaller –ignoreSysPrereqs

Now it will open a graphical interface for further configurations. At first it ask for your email address for support. It is optional to provide it .Move to next.

For The Installation Option select create and configure database.
 

For the System Class select desktop class or server class.It is better if you select server class.
 

For the Typical Installation select OSDBA as dba and select create container database and provide name for that database. You need to provide administrative passwords here. Keep it in mind.

Move to next step of installation.
 

You will get a error at 59% saying error in invoking target…. .For that you need to log into your root user without logoff oracle user and do some modifications in files.
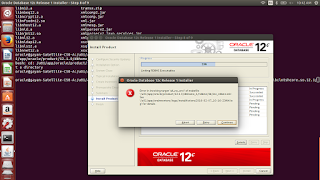
59% error 

Hint: Search for uppercase constant in below images and easily find the place and do required modification.
 gedit /u01/app/oracle/product/12.1.0/dbhome_1/rdbms/lib/ins_rdbms.mk


 gedit /u01/app/oracle/product/12.1.0/dbhome_1/rdbms/lib/env_rdbms.mk


 gedit /u01/app/oracle/product/12.1.0/dbhome_1/network/lib/ins_net_server.mk


Login to oracle user and press retry option in error message. Now  error need to be disappear. It will prompt you to execute two script files. Run them as root user. Then finish the installation.


 From here after you need to create a database. So move do below path and run given application.

Here you need to provide global database name

 
Select default listener and press next.

 
Here you need to enable archiving option.

 
Select character set as Unicode. Its better to keep default configurations.

 
Select create database.

 
Let application to complete process.
 

Now you have configured database management system and a database. you need to have flash configured to view Oracle GUI through your web browser.

 
Now type this URL on your browser
https://:5500/em
 

Provide username as SYS and your administrative password here to login.
 

After restart you need to run below commands.
 To start listener:
export ORACLE_BASE=/u01/app/oracle
export ORACLE_HOME=/u01/app/oracle/product/12.1.0/dbhome_1
export ORACLE_OWNR=oracle
export PATH=$PATH:$ORACLE_HOME/bin
export ORACLE_SID=orcl
$ORACLE_HOME/bin/lsnrctl start

To start database:
sqlplus /nolog
connect sys as sysdba
STARTUP;
EXIT;
To stop database:
sqlplus /nolog
connect sys as sysdba
SHUTDOWN;
EXIT;
To stop listener:
$ORACLE_HOME/bin/lsnrctl stop