Installation Process
As the first step to install Oracle12c you need to make
your Unix system up to date. So run below commands to upgrade packages in your
computer. Open your terminal by pressing ALT+CTRL+T at same time.
sudo apt-get update
sudo apt-get dist-upgrade
sudo reboot
Now your computer will restart. After completing above
commands your computer has newest version of repositories and packages.
Now you need to install dependencies for the Oracle package.
You can complete that process by below command.
sudo apt-get -y install alien binutils build-essential \
cpp-4.4 debhelper g++-4.4 gawk gcc-4.4 gcc-4.4-base \
gettext html2text lib32z1 lib32ncurses5 intltool-debian \
ksh lib32z1-dev
libaio-dev libaio1 libbeecrypt7 libc6 \
libc6-dev
libc6-dev-i386 libelf-dev libelf1 libltdl-dev \
libltdl7 libmotif4
libodbcinstq4-1 libodbcinstq4-1:i386 \
libqt4-core
libqt4-gui libsqlite3-0 libstdc++5 libstdc++6 \
libstdc++6-4.4-dev lsb lsb-core lsb-cxx
lsb-desktop \
lsb-graphics make odbcinst pax po-debconf rpm \
rpm-common sysstat
unixodbc unixodbc-dev unzip
 |
| installing dependencies |
A special requirement in Oracle installation package is
you can’t install it using root user. So you need to create non-root user with
permission for directories. Create secondary user with below commands. To run
these commands you need to be root/root equivalent to user. For that run below command.
sudo su
sudo addgroup oinstall
sudo addgroup dba
sudo addgroup nobody
sudo usermod -g nobody nobody
sudo useradd -g oinstall -G dba -p password -d /home/oracle -s /bin/bash oracle
sudo mkdir /home/oracle
sudo chown -R oracle:dba /home/oracle
sudo mkdir -p /u01/app/oracle
sudo mkdir -p /u01/binaries
sudo chown -R oracle:dba /u01
sudo passwd oracle
If you are done upto this point now you need to configure kernel parameters and resource limits.
echo 'Red Hat Linux release 6' | sudo tee -a /etc/redhat-release
sudo mkdir /usr/lib64
sudo ln -s /etc /etc/rc.d
sudo ln -s /lib/x86_64-linux-gnu/libgcc_s.so.1 /lib64/
sudo ln -s /usr/bin/awk /bin/awk
sudo ln -s /usr/bin/basename /bin/basename
sudo ln -s /usr/bin/rpm /bin/rpm
sudo ln -s /usr/lib/x86_64-linux-gnu/libc_nonshared.a /usr/lib64/
sudo ln -s /usr/lib/x86_64-linux-gnu/libpthread_nonshared.a /usr/lib64/
sudo ln -s /usr/lib/x86_64-linux-gnu/libstdc++.so.6 /lib64/
sudo ln -s /usr/lib/x86_64-linux-gnu/libstdc++.so.6 /usr/lib64/
sudo cp /etc/security/limits.conf /etc/security/limits.conf.original
echo "#Oracle 12C shell limits:" | sudo tee -a /etc/security/limits.conf
echo "oracle soft nproc 2048" | sudo tee -a /etc/security/limits.conf
echo "oracle hard nproc 16384"| sudo tee -a /etc/security/limits.conf
echo "oracle soft nofile 1024" | sudo tee -a /etc/security/limits.conf
echo "oracle hard nofile 65536" | sudo tee -a /etc/security/limits.conf
echo "#" | sudo tee -a /etc/sysctl.conf
echo "# Oracle 12C entries" | sudo tee -a /etc/sysctl.conf
echo "fs.aio-max-nr=1048576" | sudo tee -a /etc/sysctl.conf
echo "fs.file-max=6815744" | sudo tee -a /etc/sysctl.conf
echo "kernel.shmall=2097152" | sudo tee -a /etc/sysctl.conf
echo "kernel.shmmni=4096" | sudo tee -a /etc/sysctl.conf
echo "kernel.sem=250 32000 100 128" | sudo tee -a /etc/sysctl.conf
echo "net.ipv4.ip_local_port_range=9000 65500" | sudo tee -a /etc/sysctl.conf
echo "net.core.rmem_default=262144" | sudo tee -a /etc/sysctl.conf
echo "net.core.rmem_max=4194304" | sudo tee -a /etc/sysctl.conf
echo "net.core.wmem_default=262144" | sudo tee -a /etc/sysctl.conf
echo "net.core.wmem_max=1048586" | sudo tee -a /etc/sysctl.conf
Below command is specifying how much of physical memory you allocate for oracle processes. In this case it allocate 1GB in byte.
echo "kernel.shmmax=1073741824" | sudo tee -a /etc/sysctl.conf
You can see parameters you set using below command.
sudo sysctl –p
You need to change start-up script, for that run below command
for i in 0 1 2 3 4 5 6 S
do sudo ln -s /etc/rc$i.d /etc/rc.d/rc$i.d
done
Now your system is well configured for Oracle installation. You need to download Oracle setup file from oracle website. Please keep in mind to download Linux x86-64 distribution. Now you need to extract downloaded zip files.
cd /u01/binaries
cp/linuxamd64_12102_database_se2_*of2.zip ./
unzip linuxamd64_12102_database_se2_1of2.zip
unzip linuxamd64_12102_database_se2_2of2.zip
Before doing installation we need to grant permission to the user.For that run below command.
chown -Rf oracle:dba /u01/binaries
Now you need to
switch to non root user. For that logoff and login as newly created oracle user.
After login run below command.
 |
| run installer |
/u01/binaries/database/runInstaller –ignoreSysPrereqs
Now it will open a
graphical interface for further configurations. At first it ask for your email
address for support. It is optional to provide it .Move to next.
For The Installation
Option select create and configure database.
For the System
Class select desktop class or server class.It is better if you select
server class.
For the Typical
Installation select OSDBA as dba and select create container database and
provide name for that database. You need to provide administrative passwords
here. Keep it in mind.
Move to next step of
installation.
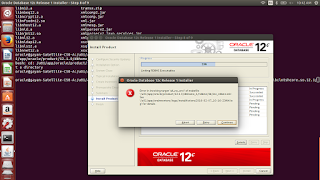
You will get a error
at 59% saying error in invoking target…. .For that you need to log into your
root user without logoff oracle user and do some modifications in files.
 |
| 59% error |
Hint: Search for uppercase constant in below
images and easily find the place and do required modification.
gedit /u01/app/oracle/product/12.1.0/dbhome_1/rdbms/lib/ins_rdbms.mk
gedit /u01/app/oracle/product/12.1.0/dbhome_1/rdbms/lib/env_rdbms.mk
Login to oracle user and press retry option in
error message. Now error need to be disappear.
It will prompt you to execute two script files. Run them as root user. Then
finish the installation.
Here you need to provide global database name
Select default listener and press next.
Here you need to enable archiving option.
Select character set as Unicode. Its better to
keep default configurations.
Select create database.
Let application to complete process.
Now you have configured database management system
and a database. you need to have flash configured to view Oracle GUI through
your web browser.
Now type this URL on your browser
https://:5500/em
Provide username as SYS and your administrative
password here to login.
After restart you need to run below commands.
export ORACLE_BASE=/u01/app/oracle
export ORACLE_HOME=/u01/app/oracle/product/12.1.0/dbhome_1
export ORACLE_OWNR=oracle
export PATH=$PATH:$ORACLE_HOME/bin
export ORACLE_SID=orcl
$ORACLE_HOME/bin/lsnrctl start
To start database:
sqlplus /nolog
connect sys as sysdba
STARTUP;
EXIT;
To stop database:
sqlplus /nolog
connect sys as sysdba
SHUTDOWN;
EXIT;
To stop listener:
$ORACLE_HOME/bin/lsnrctl stop


0 comments:
Post a Comment
Leave your comment and feedback here for me